A jQuery Plugin for Custom, CSS Styled, Retweet Buttons
See the Demo - Download the Zip
Retweet buttons are all over the internet now. They are a handy for giving visitors a quick way to share a post. Most of the retweet buttons out there come from just a few places:
- The Classic tweetmeme Button
- The newish Topsy Button
- The BackType Tweetcount Button
These all work great and are easily recognizable. Sometimes we have wanted to add a button that matches a site a little better. The topsy button has some customization, but not much. It just allows you to change color schemes.
Ideally, it would be possible to put together completely custom markup and styling for a button. That is the purpose of this plugin. It allows you to build your own button and style it however you like from the ground up. It is a simple jQuery plugin that can be called this easy:
$('#retweet').customRetweet();
It works by using two really handy APIs. It goes to topsy to get the tweet count of the url and then it goes to bit.ly to get a shortened link. It then puts together a bunch of variables you can use to build a custom markup and a custom retweet message. For example:
$('#retweet').customRetweet({
    template: '<a href="{{retweetURL}}">Retweet this Post!</a>',
    retweetTemplate: 'RT @{{account}} - {{title}} - {{shortURL}}'
});
This code would put the completed template code into the element with "retweet" as an id. When the created link was clicked, it would provide twitter with the text from the retweetTemplate variable.
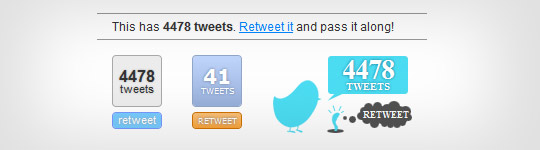
Unlike the standard buttons I link to above, this markup exists in the DOM so it is possible to style it directly with CSS. This makes essentially any look possible for these buttons. In the demo, you can see three simple styles designed by Lenny at Hey Monkey Design. (The last using a bird drawn by Pasquale D'Silva) These are free to be used on your site or adapted for your needs.
To explain how to use the plugin, I'll go into depth on how I made the second one.
Using the Plugin
The first thing to do is to set up a container for the button. This makes it easy to place and target when styling:
<div class="retweetbutton"></div>
Next, we'll need to set up the plugin so that we can have our desired markup added to the container. This is really easy to do -- just write the markup and sprinkle in the information you want using simple template tags:
$('.retweetbutton').customRetweet({
	template: '<a class="tweets" href="{{allTweetsURL}}">{{count}} tweets</a><a href="{{retweetURL}}" class="retweet">retweet</a>'
});
This javascript will go and fetch the information that is in the double-curly-braced tags and insert it into the markup. This means any markup can be used and the information can just be sprinkled in.
Finally, the last step is to set up the CSS. For this button I've decided to take advantage of some modern CSS and build it entirely without images. The gradients are accomplished using the cross-browser technique described on Web Designer Wall.
.retweetbutton {
	width: 50px;
	text-align: center;
	text-transform: uppercase;
	font: 8px verdana,sans-serif;
}
	.retweetbutton a {
		position: relative;
		display: block;
		border-radius: 4px;
		-moz-border-radius: 4px;
		-webkit-border-radius: 4px;
		text-shadow: 0px 0px 3px #667ba2;
		-moz-text-shadow: 0px 0px 3px #667ba2;
		-webkit-text-shadow: 0px 0px 3px #667ba2;
		text-decoration: none;
		color: #fff;
	}
	.retweetbutton .tweets {
		border: 1px solid #92a6ca;
		background: #bed4fb;
		filter: progid:DXImageTransform.Microsoft.gradient(startColorstr='#c2d8fe', endColorstr='#98b0da');
		background: -webkit-gradient(linear, left top, left bottom, from(#c2d8fe), to(#98b0da));
		background: -moz-linear-gradient(top,  #c2d8fe,  #98b0da);
		height: 50px;
		line-height: 70px;
	}
		.retweetbutton .tweets strong{
			position: absolute;
			top: -15px;
			left: 0;
			width: 48px;
			font-size: 20px;
		}
	.retweetbutton .retweet {
		display: block;
		margin: 5px 0 0 0;
		border: 1px solid #d07300;
		background: #fbb45a;
		filter: progid:DXImageTransform.Microsoft.gradient(startColorstr='#fcc37c', endColorstr='#fba63b');
		background: -webkit-gradient(linear, left top, left bottom, from(#fcc37c), to(#fba63b));
		background: -moz-linear-gradient(top,  #fcc37c,  #fba63b);
		height: 15px;
		line-height: 16px;
	}
	.retweetbutton .retweet:hover {
		background: #fff;
		color: #bb6700;
		text-shadow: 0px 0px 2px #aaa;
		-moz-text-shadow: 0px 0px 2px #aaa;
		-webkit-text-shadow: 0px 0px 2px #aaa;
	}
Once this code is set -- the button will begin working. You'll notice that in the JS I only specified the template option.
Plugin Options
Many other options can be used with the plugin, but not all of them are required as they have sensible defaults. Here is a complete list of options available when setting this up:
settings = $.extend({
	// topsy settings
	topsyAPI: 'http://otter.topsy.com/stats.js?url=',
	// bit.ly settings
	shorten: true,
	bitlyLogin: 'customretweet',
	bitlyKey: 'R_be029e1ffd35d52dd502e1495752f0c2',
	bitlyAPI: 'http://api.bit.ly/v3/shorten?format=json&',
	// template values
	url: location.href,
	title: document.title,
	account: 'topsy',
	// templates
	retweetTemplate: 'RT @{{account}} | {{title}} | {{shortURL}}',
	template: 'Number of Tweets: {{count}} | All Tweets | Retweet'
}, settings);
The most important options are the template values and the templates. The template values are options you can send to the templates. By default it will use the page url and page title and retweet from the 'topsy' twitter account. The templates are the markup that the plugin will use to build the button and default retweet message.
The less important settings are the API values. By default this uses the topsy and bitly APIs. Currently no other APIs are supported, but this information is abstracted anyway. If you would like to use a different bit.ly API account it can be done through these settings.
The Template Variables
When creating the templates for the button markup and default retweet text, there are a number of variables available. To use one of the, just use currly braces without spaces. For example: {{variableName}}. There are many more variables available than commonly used. Here is the complete list:
General
- count - The total number of tweets the url has.
- title - The title of the page. This can be overridden in the settings.
- url - The full url of the page. This can be overridden in the settings.
- account - The twitter account to use in the retweetTemplate. For example "gethifi" or "nmcteam"
- shortURL - The bit.ly shortened version of the full url.
- allTweetsURL - The link to all tweets of the url on topsy.
Topsy (documentation)
- all - This is the count. The count variable is just an alias of this.
- influential - The number of 'influential' tweets the url has.
- contains/topsy_trackback_url - Not generally useful.
Bit.ly (documentation)
- url - This is NOT used. Since url is already used, this is renamed to shortURL.
- hash - the bit.ly identifier for long_url that is unique to the API account.
- global_hash - the global bit.ly identifier used for tracking stats.
- long_url - the original url.
- new_hash - this is 1 if it is the first time the long_url has been shortened by bit.ly
This covers just about everything. For any in depth comments or cool usage ideas, leave them in the comments.
Related Posts


Comments
рейтинг казино по выигрышам
Благодарствую за много букв.Осознал безполезный опыт.
Как видно из текста, что преуспеть
здесь и сейчас невозможно?
Ошеломлен.
Kassie
I'm curious to find out what blog platform you'reworking with? I'm having some small security issues with my latest site and
I would like to find something more safe. Do you have any
suggestions?
Daniel Quijano
Looks awesome!! can't wait to install it!!!Yousuf Khan
Topsy shorts links with bit.ly but I want to use the original/full link, how to do it?roger
To follow up, I believe this was an issue with Twitter updating it's method to using Web Intents.http://thenextweb.com/twitter/2011/05/18/twitter-disables-status-query-strings-old-twitter-website-buttons-begin-to-break/
In my case i got it working by changing the tmplvars.retweetURL:
tmplvars.retweetURL = 'http://twitter.com/intent/tweet?text=' escape(tmplvars.title) ' -&url=' escape(tmplvars.shortURL) '&via=' escape(tmplvars.account);
and include the following javascript file in the header: http://platform.twitter.com/widgets.js
Sneaky, twitter, real sneaky.
roger
Hi,The demo page doesn't work for me. I get directed to twitter, but it doesn't show that a retweet was ever sent.
I have the same issue with a blog that uses the same plugin. Has anything changed?
Thanks
Ryan
Hi,I'm trying to get this set up but for some reason I don't get any button showing at all. http://ryanon.co.uk/special.php - am I missing something?
Filipe Valente
Disregard my latest comment it's working fine now thanksFilipe Valente
I can believe I wrote border instead of bother I have to stay away from css for a while lolFilipe Valente
One last question when I retweet I'm getting thisRT @topsy | Internal Alliance Logo | realwebdesigns.com | new york web design agency | http://bit.ly/eLtxGo
Now after the RT I'm getting @topsy how do I change that I though it was on the js under account but it stays the same
Joel Sutherland NMC team member
It appears to be working:http://realwebdesigns.com/new-website-and-logo/
http://topsy.com/realwebdesigns.com/new-website-and-logo/
Filipe Valente
I think it actually works sorry to border you with that great code keep the code workFilipe Valente
I have tried with <?php the_permalink() ?> but now the counter stays to 0Filipe Valente
I'm using this on wordpress blog post I can i specify a url is there like a function that does thatJoel Sutherland NMC team member
Where you have:url: 'http://realwebdesigns.com',
It should be:
url: 'http://realwebdesigns.com/a-specific-url'
Filipe Valente
Oh the code on the comment is not appearing right but can you see the right code? thanksFilipe Valente
Thanks It's a wordpress siteI inserted this in the single page
This is the function I inserted
$(function(){
$('#textretweet').customRetweet({
url: 'http://realwebdesigns.com',
template: 'This has {{count}} tweets. Retweet it and pass it along!'
});
var standard = ''
'{{count}}'
'tweets'
''
'retweet';
$('#wormretweet').customRetweet({
url: 'http://realwebdesigns.com',
template: standard
});
});
Do I have to change something to the js
Joel Sutherland NMC team member
Filipe:1. Your site looks awesome. Great use of @font-face
2. It looks like the url you are giving it is your whole domain, not the post itself. That should fix it.
Filipe Valente
It's very cool but I have a little problem using it the number stays the same it's stays at 6 for some reason take a look http://realwebdesigns.com/remo-cavallini-logo/Thanks
designer store
I am so pleased that so great creators give their creations in our world. If I were the monarch of the monarchy, I would give the creator of this essay with goldkadir avci
Very good. Thanks for sharing and tutorial.Deluxe Blog Tips
Very nice. The buttons look sexy :). Thanks for sharing.Jhon Doe
good job!!Beben
if anybody just customize a:hover and color, maybe its can be alternative... http://www.social.com/main/download/button/NetKit
I always wondered how to do that :) Thanks for the tipJoel Sutherland NMC team member
Thanks! I look forward to some of the other designs people make with this script.Abhisek
wow! sleek and sexy. :-)Leave a comment